- REVIEWS
Product Category Product Category 
Brands Brands - VIDEOS
- CARP SCENE
- WIN
Anatomy Of A Carp Rig | Lewis Read’s Germaligner Rig
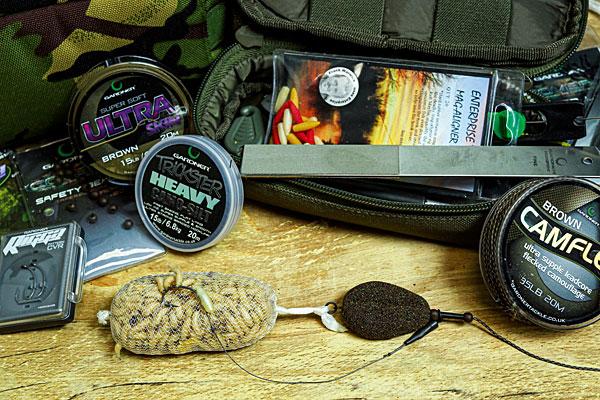
I can hear the exasperated guttural sigh as another reader mutters: “Oh no, not another silly rig with more ironmongery than a WW1 dreadnought!” But no! This time I’m revisiting what I still believe to be the ultimate winter tactic and bait combination, namely the amazing mag-aligner rig!
This superbly effective rig somehow and miraculously combines a subtle ‘match the hatch’ hook bait that’s pretty much completely camouflaged with a fast-reacting rig and an “IT’S HERE!” patch of bait that acts as a beacon to carp. It’s the real deal, this one…
As is so often the case, this very special little presentation seems to have dropped off most anglers’ radars – maybe because on some venues the ‘germs’ were used in ridiculous quantities so they have been banned, and when one venue is proactively reactive like that others follow, with very little thought to different venues and scenarios.
If maggots are allowed on your lake and the venue fits in with the general profile of a relatively clear lake bed then it is always going to be in the top three winter approaches wherever I drape a limp line. Even if there are other species it’s still worth giving it a good go, because a patch of maggots on the lake bed is very different to fish of all species reacting to maggots falling through the water column – and as such they last vastly longer than trickle feeding with a small spod.
The basic mag-aligner method is refreshingly simple. If you’re trying it for the first time just follow the clear step-by-step on how to tie the hook arrangement. There are a couple of details that are worth conveying to ensure your rigs work as well as they should.
 This breeze block of a common bounced the scales round to 55lb 8oz.
Note the orientation of the maggot on the hook, with the blunt end off the hook. Also, it’s always important to bear in mind that a soft and supple braided hook link allows that relatively small suck point to react comparatively uninhibited when a carp vacuums up the freebies that are an integral part of the trap.
The hook you choose is vital and I would personally recommend a curve shanked pattern like the Mugga or the uber-aggressive CVR pattern. The shape works in concert with the alignered Enterprise grub and both offer splendiferous hook-holds. Let the conditions dictate the hook size, going as small as 12s (with three or four maggots hooked on) for open-water work with medium fish and as big as a size 8 with half a dozen wrigglers impaled on the hook.
You see, a BIG part of the rig’s effectiveness is the way it is fished with a goodly sized micromesh PVA bag of wrigglers. In practice, as that bag explodes the maggots erupt out, covering the hook link and making the rig virtually impossible to single out as the maggots cover the rig components/hook link.
It’s probably best to use as big a bag as you can comfortably cast, and as carp find the lovely visual patches of white maggots on the lake bed they will inevitably drop and have a little suck about. In practice, as a fish sucks in the germs and the hook itself it will get nailed and cough up the maggots as it tries to pull your rod in… this is spreading the maggots about a bit on your area and a fresh trap set back on the same spot will often go quickly.
Lead arrangement-wise, a helicopter constructed with an inline lead held on with a flexi-ring swivel (to which you tie the maggot bag) is the best choice as this means you can nick the hook on to the PVA and you don’t get tangles either; just a perfect visual patch of one of the most natural and attractive baits in the universe, daring passing carp to come and have a cheeky suck.
Step-By-Step: Lewis Read’s Germaligner Rig
 1. Cut off a 12in length of soft braid. A soft coated braid can also be used if you prefer.
 2. Take a small curved pattern hook – Lewis recommends a size 10 Rigga CVR hook.
 3. Whip on the hook using a knotless knot. Use plenty of turns to ensure the soft braid grips – there is no need for a hair.
 4. Pierce a Mag Aligner grub line-aligner style as shown, using a fine baiting needle or sewing needle.
 5. Thread the Mag Aligner grub on to your hook link, ensuring the pointed end is facing the hook!
 6. Push the grub over the eye of the hook and to cover the whipping.
 7. The line aligner and curve pattern hook makes the grub flip over and grab.
 8. Thread a few real maggots on to the hook for a bit of live action wriggling!
 9. Position these around the bed of the hook – the hook section is complete!
 10. Tie a figure of eight loop in the end of the braid, then moisten and tighten.
 11. Thread on a tungsten anti-tangle sleeve – this one has been trimmed down.
 12. Splice a length of leadcore/leader and thread on two large bore safety beads and a quick change swivel.
 13. Next on goes an inline lead...
 14. … and finally, loop a ring swivel on to the leader and pull everything down tight.
 15. The inline stem acts as a helicopter system – the top bead should pop off under a little tension and slide freely up the leader.
 16. Attach your hook link and cover the clip with the sleeve.
How To… Attach The Maggot Bag
 1. Pour in a large handful of maggots – the more the merrier!
 2. Tie off the PVA bag leaving a long tag end.
 3. Tie the mesh bag of maggots to the ring swivel in the lead.
 4. Carefully nick the hook into the mesh. Be careful not to burst any maggots.

- Log in or register to post comments


| Gear Reviews | More Gear Reviews | News Articles | Venues Videos | Shop | Subscriptions | Resources |